News Post Guide: Difference between revisions
m Baseplate moved page Wiki News Post Guide to News Post Guide |
No edit summary |
||
| Line 1: | Line 1: | ||
__NOTOC__ | |||
__NOEDITSECTION__ | |||
<div style="background: linear-gradient(135deg, #0b132b 0%, #1c2541 50%, #3a506b 100%); border: 2px solid #e0a96d; border-radius: 12px; padding: 2em; color: #ffffff; box-shadow: 0 4px 20px rgba(0,0,0,0.3); margin-bottom: 2em;"> | |||
<h1 style="color: #f4a261; border-bottom: 2px solid #e0a96d; font-family: 'Georgia', serif; font-size: 2em; margin-top: 0;">News Post Guide</h1> | |||
<p style="font-size: 1.05em; color: #e0e1dd; line-height: 1.6;">A complete walkthrough on how to properly format, publish, and add your character or domestic news posts to the Aquila Wiki and timeline.</p> | |||
</div> | |||
<div style="display: flex; flex-direction: column; gap: 1.5em;"> | |||
<!-- 1. Creating the Page --> | |||
<div style="background: #ffffff; border: 1px solid #d1d5db; border-top: 4px solid #1c2541; border-radius: 8px; padding: 1.5em; box-shadow: 0 2px 4px rgba(0,0,0,0.05);"> | |||
<h3 style="margin-top: 0; color: #1c2541; border-bottom: 2px solid #e0a96d; padding-bottom: 0.4em; font-family: 'Georgia', serif; font-size: 1.3em;">1. Creating the Page</h3> | |||
<p style="line-height: 1.6; color: #374151;">Ensure that your title begins with your character/nation name followed by a forward slash. For example:</p> | |||
<ul style="color: #374151; line-height: 1.6;"> | |||
<li><code>Full Character Name/Post Title</code></li> | |||
<li><code>Full Nation Name/Post Title</code></li> | |||
</ul> | |||
<p style="line-height: 1.6; color: #374151; margin-top: 1em;">Then search it into the search bar and click the red text to create the page.</p> | |||
<div style="text-align: center; margin-top: 1em;">[[File:News Post Guide1.png|600px|thumb|center|Searching and creating the page via red link]]</div> | |||
<p style="line-height: 1.6; color: #374151; margin-top: 1em;">This ensures that a title can be used several different times by other characters and sorts the news posts properly. Don't worry, anything preceding the post title will automatically be hidden when using the News Header template!</p> | |||
</div> | |||
<!-- 2. Inserting the Template --> | |||
<div style="background: #ffffff; border: 1px solid #d1d5db; border-top: 4px solid #e0a96d; border-radius: 8px; padding: 1.5em; box-shadow: 0 2px 4px rgba(0,0,0,0.05);"> | |||
<h3 style="margin-top: 0; color: #1c2541; border-bottom: 2px solid #e0a96d; padding-bottom: 0.4em; font-family: 'Georgia', serif; font-size: 1.3em;">2. Inserting the Template</h3> | |||
<p style="line-height: 1.6; color: #374151;">Once you have clicked the red text, you have created the page. At the top, click insert and then template.</p> | |||
<div style="text-align: center; margin-top: 1em;">[[File:News Post Guide3.png|600px|thumb|center|The insert menu]]</div> | |||
<p style="line-height: 1.6; color: #374151; margin-top: 1em;">Then search up 'news' and click the 'News Header' Template.</p> | |||
<div style="text-align: center; margin-top: 1em;">[[File:News Post Guide4.png|600px|thumb|center|Selecting the News Header template]]</div> | |||
</div> | |||
<!-- 3. Filling template content --> | |||
<div style="background: #ffffff; border: 1px solid #d1d5db; border-top: 4px solid #1c2541; border-radius: 8px; padding: 1.5em; box-shadow: 0 2px 4px rgba(0,0,0,0.05);"> | |||
<h3 style="margin-top: 0; color: #1c2541; border-bottom: 2px solid #e0a96d; padding-bottom: 0.4em; font-family: 'Georgia', serif; font-size: 1.3em;">3. Filling Template Content</h3> | |||
<p style="line-height: 1.6; color: #374151;">Once the News Header template is added, you are shown this screen:</p> | |||
<div style="text-align: center; margin-top: 1em;">[[File:News Post Guide5.png|600px|thumb|center|Template configuration fields]]</div> | |||
<ul style="color: #374151; line-height: 1.6; margin-top: 1em;"> | |||
<li><strong>News Category Type</strong> = Character/Domestic/Global News (Only)</li> | |||
<li><strong>Subheading / Headline</strong> = Optional Subheading</li> | |||
<li><strong>Real-world date (REQUIRED)</strong> = Must be in <code>YYYY-MM-DD</code> format!</li> | |||
<li><strong>Author (Character)</strong> = Character name only (not player name!). Leave blank if using a news Publisher/Agency. Mostly for character news posts.</li> | |||
<li><strong>Publisher / Agency</strong> = e.g., Government of <nowiki>[[Nation]]</nowiki> (Mostly for domestic/global news)</li> | |||
</ul> | |||
<p style="line-height: 1.6; color: #374151; margin-top: 1em;">Once everything is filled in, click insert!</p> | |||
</div> | |||
<!-- 4. Inserting your news post --> | |||
<div style="background: #ffffff; border: 1px solid #d1d5db; border-top: 4px solid #e0a96d; border-radius: 8px; padding: 1.5em; box-shadow: 0 2px 4px rgba(0,0,0,0.05);"> | |||
<h3 style="margin-top: 0; color: #1c2541; border-bottom: 2px solid #e0a96d; padding-bottom: 0.4em; font-family: 'Georgia', serif; font-size: 1.3em;">4. Inserting Your News Post</h3> | |||
<p style="line-height: 1.6; color: #374151;">Once inserted, it should look like this!</p> | |||
<div style="text-align: center; margin-top: 1em;">[[File:News Post Guide6.png|600px|thumb|center|Header inserted on page]]</div> | |||
<p style="line-height: 1.6; color: #374151; margin-top: 1em;">You can then put your news post/text beneath the header. As you can see, the in-universe date is automatically calculated. Once finished, you can click 'Save Page' on the top right!</p> | |||
<div style="text-align: center; margin-top: 1em;">[[File:News Post Guide7.png|600px|thumb|center|Categories automatically added on save]]</div> | |||
<p style="line-height: 1.6; color: #374151; margin-top: 1em;">You can see that the categories for the news post are automatically added based on the Year, Type of news post, and the character posting it! You can also see that Full Character Name/ is automatically hidden as well!</p> | |||
</div> | |||
<!-- 5. Adding the post to the timeline --> | |||
<div style="background: #ffffff; border: 1px solid #d1d5db; border-top: 4px solid #1c2541; border-radius: 8px; padding: 1.5em; box-shadow: 0 2px 4px rgba(0,0,0,0.05);"> | |||
<h3 style="margin-top: 0; color: #1c2541; border-bottom: 2px solid #e0a96d; padding-bottom: 0.4em; font-family: 'Georgia', serif; font-size: 1.3em;">5. Adding the Post to the Timeline (Recommended)</h3> | |||
<p style="line-height: 1.6; color: #374151;">Once the page is saved, you can add it to the timeline! Click the Era Nova, Year X category at the bottom of the page:</p> | |||
<div style="text-align: center; margin-top: 1em;">[[File:News Post Guide8.png|600px|thumb|center|Category link at page bottom]]</div> | |||
<p style="line-height: 1.6; color: #374151; margin-top: 1em;">You are then brought to the Era Nova Year X page!</p> | |||
<div style="text-align: center; margin-top: 1em;">[[File:News Post Guide9.png|600px|thumb|center|Era Nova Year page]]</div> | |||
<p style="line-height: 1.6; color: #374151; margin-top: 1em;">Enable edit mode by clicking 'Edit' and scroll down the table to find the date you want in Global/Domestic/Character News (e.g., 2026-09-05).</p> | |||
<div style="text-align: center; margin-top: 1em;">[[File:News Post Guide10.png|600px|thumb|center|Timeline table date row]]</div> | |||
<p style="line-height: 1.6; color: #374151; margin-top: 1em;">As you can see in this specific case, the space is already taken up. Don't worry! Follow these instructions:</p> | |||
<ol style="color: #374151; line-height: 1.6;"> | |||
<li>Click the box you want to use and you should see a blue arrow on the left. | |||
<div style="text-align: center; margin-top: 1em;">[[File:News Post Guide11.png|600px|thumb|center|Blue selection arrow]]</div></li> | |||
<li>Click 'Insert Below'. | |||
<div style="text-align: center; margin-top: 1em;">[[File:News Post Guide12.png|600px|thumb|center|Inserting row below]]</div></li> | |||
<li>Shift-click the newly created box on the left with the existing 'In Universe Date' and merge the two boxes together. | |||
<div style="display: flex; justify-content: center; gap: 1em; flex-wrap: wrap; margin-top: 1em;"> | |||
[[File:News Post Guide13.png|400px|thumb|center|Selecting cells to merge]] | |||
[[File:News Post Guide14.png|400px|thumb|center|Merged date cell]] | |||
</div></li> | |||
<li>Now, in the post section, type <code>[[</code> to bring up the link menu. Search up your character/nation name FIRST and then locate your news post title after the /. | |||
<div style="text-align: center; margin-top: 1em;">[[File:News Post Guide15.png|600px|thumb|center|Searching for page link]]</div> | |||
Once you have found it, click it. It should then come up with a link to the page. Now, you must get rid of the Full Character Name/ before the title—you can do this through clicking 'Change Text' and removing it! | |||
<div style="text-align: center; margin-top: 1em;">[[File:News Post Guide16.png|600px|thumb|center|Changing display text to hide prefix]]</div></li> | |||
<li>Finally, you can do the same in the character/nation section with <code>[[</code> to link to their respective pages. Once that is done, the last thing you need to do is insert the date and boom. You're done! | |||
<div style="text-align: center; margin-top: 1em;">[[File:News Post Guide17.png|600px|thumb|center|Completed timeline row entry]]</div></li> | |||
</ol> | |||
</div> | |||
</div> | |||
[[Category:Guides]] | [[Category:Guides]] | ||
[[Category:Main Page]] | |||
Revision as of 17:37, 5 September 2026
News Post Guide
A complete walkthrough on how to properly format, publish, and add your character or domestic news posts to the Aquila Wiki and timeline.
1. Creating the Page
Ensure that your title begins with your character/nation name followed by a forward slash. For example:
Full Character Name/Post TitleFull Nation Name/Post Title
Then search it into the search bar and click the red text to create the page.

This ensures that a title can be used several different times by other characters and sorts the news posts properly. Don't worry, anything preceding the post title will automatically be hidden when using the News Header template!
2. Inserting the Template
Once you have clicked the red text, you have created the page. At the top, click insert and then template.

Then search up 'news' and click the 'News Header' Template.

3. Filling Template Content
Once the News Header template is added, you are shown this screen:

- News Category Type = Character/Domestic/Global News (Only)
- Subheading / Headline = Optional Subheading
- Real-world date (REQUIRED) = Must be in
YYYY-MM-DDformat! - Author (Character) = Character name only (not player name!). Leave blank if using a news Publisher/Agency. Mostly for character news posts.
- Publisher / Agency = e.g., Government of [[Nation]] (Mostly for domestic/global news)
Once everything is filled in, click insert!
4. Inserting Your News Post
Once inserted, it should look like this!

You can then put your news post/text beneath the header. As you can see, the in-universe date is automatically calculated. Once finished, you can click 'Save Page' on the top right!

You can see that the categories for the news post are automatically added based on the Year, Type of news post, and the character posting it! You can also see that Full Character Name/ is automatically hidden as well!
5. Adding the Post to the Timeline (Recommended)
Once the page is saved, you can add it to the timeline! Click the Era Nova, Year X category at the bottom of the page:

You are then brought to the Era Nova Year X page!

Enable edit mode by clicking 'Edit' and scroll down the table to find the date you want in Global/Domestic/Character News (e.g., 2026-09-05).

As you can see in this specific case, the space is already taken up. Don't worry! Follow these instructions:
- Click the box you want to use and you should see a blue arrow on the left.
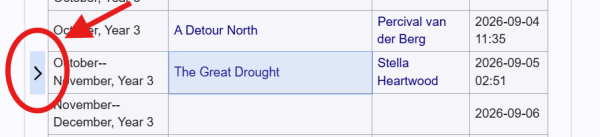
Blue selection arrow - Click 'Insert Below'.
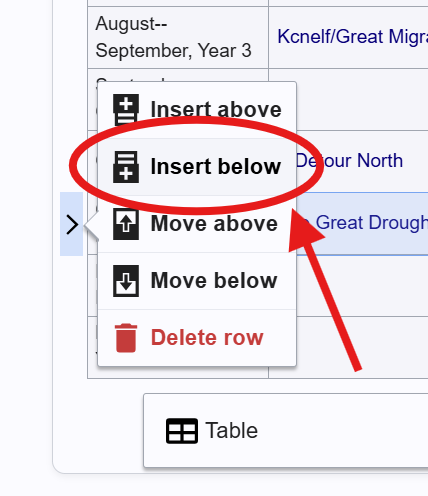
Inserting row below - Shift-click the newly created box on the left with the existing 'In Universe Date' and merge the two boxes together.
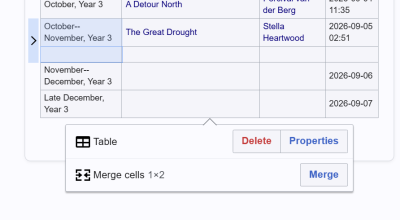
Selecting cells to merge 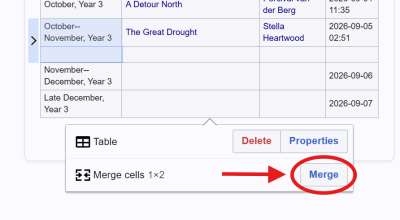
Merged date cell - Now, in the post section, type
[[to bring up the link menu. Search up your character/nation name FIRST and then locate your news post title after the /.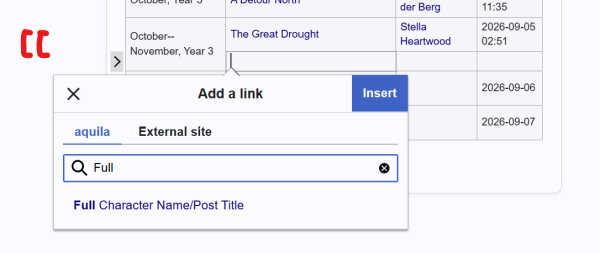
Searching for page link Once you have found it, click it. It should then come up with a link to the page. Now, you must get rid of the Full Character Name/ before the title—you can do this through clicking 'Change Text' and removing it!
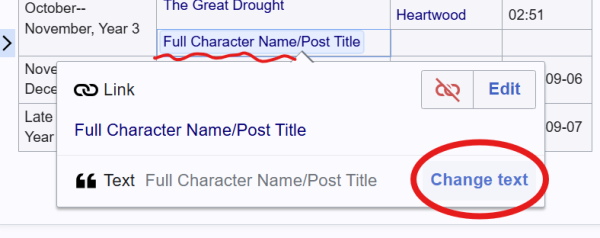
Changing display text to hide prefix - Finally, you can do the same in the character/nation section with
[[to link to their respective pages. Once that is done, the last thing you need to do is insert the date and boom. You're done!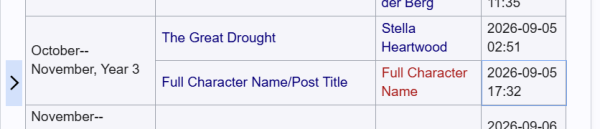
Completed timeline row entry


